A Handful of Garden-Pond Mud Changed This Low-Tech Tank
A Handful of Garden-Pond Mud Changed This Low-Tech Tank
You’ve been there: staring at the price tag on a bag of premium aquasoil, wondering if there isn’t a better, cheaper, or frankly more interesting way to get your low-tech planted tank off the ground. It’s a question that haunts every wallet-conscious aquascaper. And the answer, as you’re about to discover, might be sitting right at the bottom of a garden pond, a local lake, or even your own backyard. This isn’t a story about a lucky accident; it’s a practical, carefully considered method that, when done right, can transform your low-tech tank into a lush, vibrant ecosystem for a fraction of the cost. The key is understanding what you’re working with, how to prepare it, and how to avoid the pitfalls that turn a brilliant idea into a murky mess.
The Soil Logic
Aquasoils are great, but they’re essentially baked, nutrient-rich clay pellets. Pond mud, on the other hand, is nature’s own slow-release fertilizer. It’s a complex matrix of decomposed organic matter, mineral particles, and the very bacteria your plants need to thrive. In a low-tech setup—no CO2 injection, just light and time—this natural richness can be a godsend. You’re not fighting your substrate; you’re partnering with it. The mud provides a steady, gentle supply of nutrients that your plants can tap into over months, without the sudden spikes or crashes you might get from a heavily dosed liquid fertilizer. It’s the difference between a fast-food diet and a slow-cooked, nutrient-dense meal for your root-feeding plants.
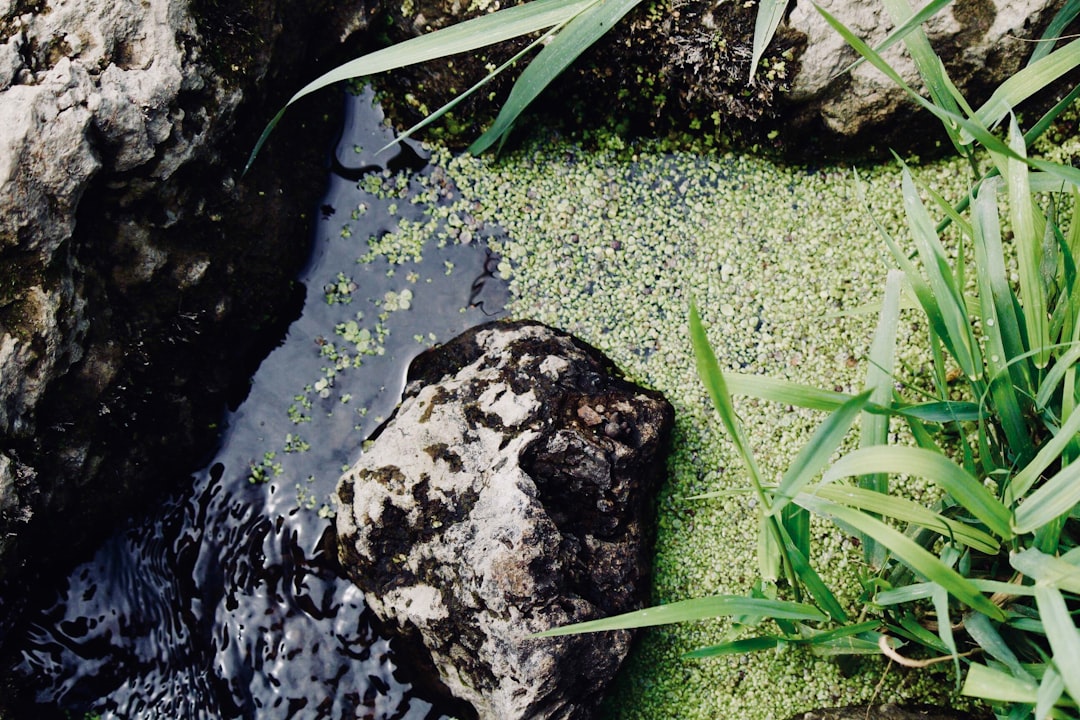
A Mature Pond, a Small Bucket
You can’t just scoop mud from any old puddle. The quality of your starting material is everything. Your best bet is a mature, established pond—the kind with a healthy population of aquatic plants, a few fish or frogs, and a layer of dark, rich debris at the bottom. You’re looking for a sediment that’s dark brown or black, smells like damp soil (not rotten), and feels silty but not overly sandy. Avoid ponds that are heavily polluted, have a strong chemical smell, or are filled with blue-green algae. A local garden center’s decorative pond, a friend’s well-maintained koi pond, or even a slow-moving stream bed are all excellent candidates. If you’re a bit shy about public scavenging, a small, healthy garden pond in your own yard is ideal. You need about two to three inches of mud for a standard tank, so a few handfuls or a small bucket will be plenty.
The Oven at 200°F, Fresh Steam
This is where many home experiments go wrong. Raw pond mud is teeming with life—beneficial and not-so-beneficial. You’ll get tiny snails, hydra, planaria, and a soup of microorganisms that can unleash a plague in your pristine aquarium. You must sterilize the mud before it ever touches your tank. The simplest method is to bake it. Spread your mud in a thin layer (no more than an inch deep) on a baking tray lined with aluminum foil. Bake at 200°F (95°C) for about two hours. You’re not trying to burn it to ash; you’re just pasteurizing it, killing the unwanted hitchhikers while preserving the organic structure. Alternatively, you can microwave it in a microwave-safe container for five to ten minutes, but watch out for the pungent, earthy steam that will fill your kitchen. Either way, let it cool completely before proceeding.
Sand—A One-Inch Cap on the Mud
Here’s the clever part. You might think you can just dump the mud in and plant away. You can’t. Mud is lightweight, fine, and will cloud your water instantly. The solution is a cap—a layer of inert sand or fine gravel that holds the mud down and prevents it from mixing into your water column. You’ll want a layer of sand about one to two inches thick. Pool filter sand, play sand, or any fine-grained, chemically inert substrate works beautifully. Gently pour the sand over your mud layer, using a plate or your hand to diffuse it. You don’t want to create a sandstorm; you want a clean, even cap. Once it’s in place, you have a stable, nutrient-rich base that looks natural and won’t turn your tank into a muddy mess.
Long Tweezers and a Plate on the Substrate
Now comes the delicate dance. With your mud capped, you’ll plant your stems, rosettes, and root feeders directly into the sand. Use long tweezers to push roots deep into the mud layer. Then comes the fill. Do not pour water directly onto the sand. Instead, place a small plate or a piece of plastic tubing on the substrate and gently pour your dechlorinated water onto it. Fill slowly, taking your time. The goal is to disturb the mud cap as little as possible. You’ll see a bit of cloudiness—that’s normal—but if you’re careful, the water will clear within a day or two. A very slow drip from a hose over a few hours is the gentlest method of all.
The First Month: An Ammonia Spike, Then a Clearing
The mud is alive with bacteria, and your tank needs to cycle just like any other. You’ll likely see a small ammonia spike as the organic matter breaks down. That’s fine. Avoid large water changes for the first two weeks; let the system settle. After that, a weekly 20% water change becomes your routine. Don’t add any liquid fertilizers for at least four weeks. The mud is providing everything your plants need. You might see a burst of algae in the first few weeks—that’s the mud’s fertility getting used to your light levels. This is normal. Reduce your light photoperiod to six hours a day and keep up with your water changes.
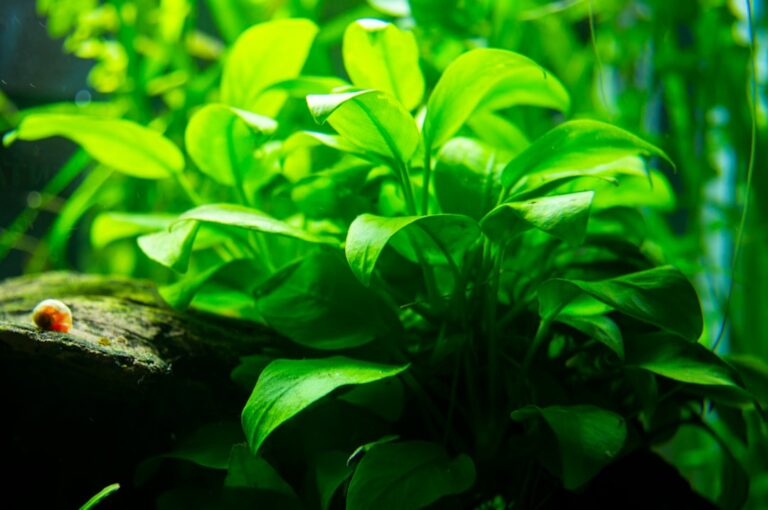
Cryptocoryne and Sword Plants in the Mud
Not all plants are created equal when it comes to a muddy bed. Root feeders—the ones that send long, hungry runners into the substrate—will absolutely adore this setup. Think of plants like Cryptocoryne species, Echinodorus (sword plants), Vallisneria, and Sagittaria. They’ll send roots deep into your mud layer and grow with a vigor you might not see in plain sand or gravel. Stem plants like Rotala and Hygrophila will also do well, but they’re more water-column feeders, so they’ll appreciate the mud’s secondary benefits. Avoid heavy root-grabbers like Bucephalandra or Anubias; they prefer to be attached to wood or rock, not buried in mud. Carpeting species like Eleocharis (dwarf hairgrass) and Glossostigma can also thrive, but they need high light and patience—the mud gives them a great start, but you’ll need to trim them regularly to keep a low carpet.
The Rotten-Egg Mistake
You might be tempted to add a thick layer of mud—three inches or more—thinking “more is better.” It’s not. A deeper mud layer can become anaerobic, creating pockets of hydrogen sulfide that smell like rotten eggs and can harm your fish and plants. Stick to one to two inches of mud, capped with one to two inches of sand. That’s all the depth you need for a stable, oxygenated substrate. Also, never disturb the mud cap once it’s set. If you uproot a plant, do it gently and replace the sand around the hole. A stirred-up mud layer will cloud your tank for days and can release trapped nutrients that trigger a massive algae bloom.
Six Months Without Substrate Fertilization
After the first two months, you’ll notice a shift. Your plants will be growing steadily, your water will be clear, and the algae will be a distant memory. Mud-based tanks can go for six months to a year without any substrate fertilization. You’ll still need to add liquid trace elements for your stem plants, but your root feeders will be thriving. When it’s time to refresh the tank—typically after a year—you can simply add a thin layer of new, sterilized mud over the old cap and then a fresh layer of sand on top. You’re not starting over; you’re layering in new nutrients like nature does in a forest floor.
The quiet satisfaction comes from watching a sword plant send a new leaf to the surface, its roots wrapped around a clump of pond mud that cost nothing but a few minutes with a trowel. Your next planted tank might just be the muddiest one yet.
📷 Photos: sydney Rae (Unsplash)